Celebration Quilt

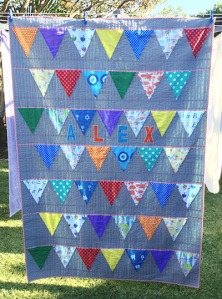
I think this quilt…I like to call it the Celebration Quilt…may be the last of the projects that I completed prior to the arrival of Peanut that I hadn’t already posted about. Like the earlier baby quilts, I was commissioned by a friend to make this for her first grandchild. Being paid for my work, and for a friend does add a bit of pressure, but I really did love the challenge of it all. And there was nothing like the deadline of the due date of my own baby to get me moving with this project!

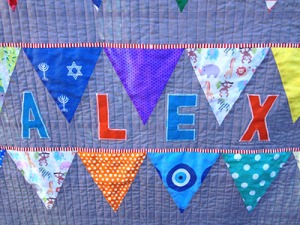
This quilt was for a newly arrived baby boy and the brief was to include bubba’s name (a shortened version) and influences of his lineage which included Australian, South African, Greek, and Jewish. Initially that sounded like a pretty tough challenge but after careful thought I decided to use fabrics to represent the heritage aspects. I had recently discovered Spoonflower and figured that would be my best bet for finding fabrics suitable for this project. Boy was I right! I was able to get 8 different prints (each heritage influence was represented by 2 different fabrics) printed and delivered for the same cost as it would have been to buy here in Australia. The fact I was able to get it all from one site was the best thing as I really didn’t have time to schlep around Sydney to find what I was looking for!

After consulting with Jenn we came up with a design she was happy with, and fortunately I found a Melly & Me pattern similar to the bunting design quilt she wanted so I ended up using that. We mixed in some bright solids/print fabrics with the Spoonflower fabrics and a fabulous candy red and white stripe for the bunting tape.

Celebration Baby Quilt

Celebration Baby Quilt

I ended up machine appliquéing bug’s name onto the quilt with a simple zigzag stitch.

Applique and straight line quilting

Applique and straight line quilting

For this quilt I decided to try my hand at machine quilting. I knew I could cope with straight lines, and ended up deciding on stitching them 1″ apart. Phew…what a mammoth effort that was! Especially as I decided to just quilt in the grey area!! So many threads to bury once it was finished! I love the red & white stripe fabric in there..so much fun.

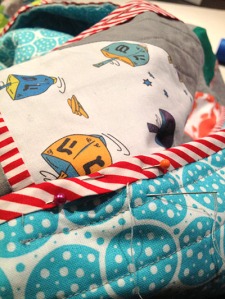
I realise now I didn’t get a good shot of the backing fabric which I loved, but here is a progress shot from when I was hand stitching the binding so you have an idea of what it was like. Don’t you love those dreidels!

Binding & backing

Binding & backing

Baby Alex has had this quilt for a year now. I know Grandma and Mum were both thrilled to receive it. I hope he has been snuggling up in it during these chilly days and nights.

Quilt Details

Pattern: Celebration Bunting Quilt by Melly & Me

Dimensions: 54″ x 74″

Fabrics: Spoonflower and my stash

Quilting: Straight line quilting on grey background 1″ apart, Aurifil 40wt colour 2606.


Update 30.7.2014 :

If you would like to see the fabrics from Spoonflower I used for the heritage influences check out my Pinterest board here.
Finish Along Q1 2014 – 2nd PHD completed!

Oh lordy I am glad I have this PHD (Project Half Done) finished now!

A mobile for Peanut’s nursery, this hasn’t been hanging over my head (pardon the pun) as long as the pouffe had been but considering Peanut is now 8 months old(!!) it was definitely time to move on from this one.

OK….so the Pom Pom mobile was an idea I came up with one day during a pregnancy haze. It seemed like a good idea at the time.

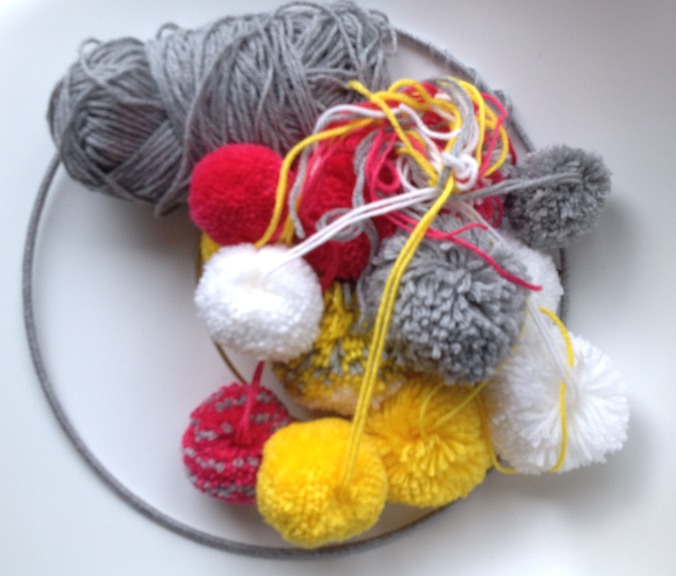
I had envisaged two different sized rings with pom poms of different sizes hanging off them. At the time we didn’t know Peanut’s sex so I was going to go with the grey, white and yellow colours we had for the nursery, then thought I could add a fuchsia or teal after the birth (as appropriate). I certainly had fun going ‘old school’ with the creating of the pom poms. I even used the old-fashioned cardboard ring method….but boy was it time consuming. And then the squirrel in me came out again and I got distracted (oh and Peanut had arrived as well)…hence it has been sitting in a bag half finished.

Pom Pom UFO

Pom Pom UFO

But enough is enough….so completing this project has been my focus for this past weekend.

All it needed was to actually join everything together and then hang it…simple enough really. I don’t know why it took me so long!

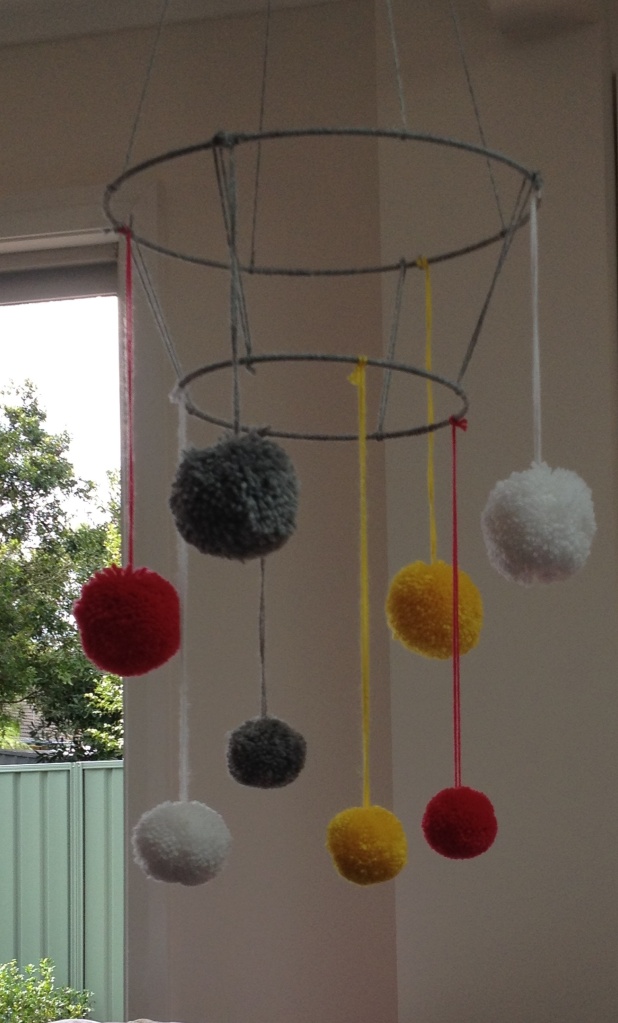
So here is the finished project….

PomPom mobile completed

PomPom mobile completed

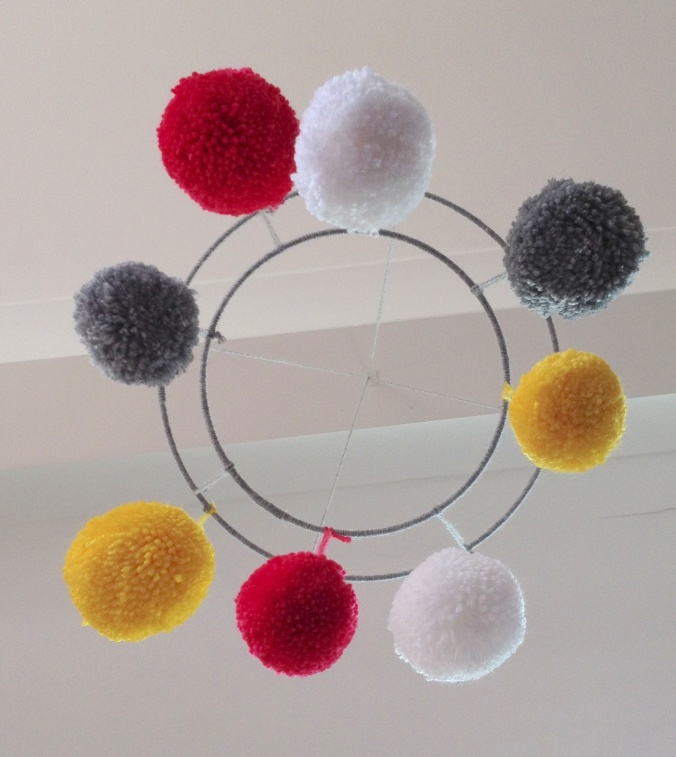
As Peanut will see it.

As Peanut will see it.

You will notice that not all the pom poms I made were included in the final piece. That’s because I learnt a few things on the way….one of them being “sometimes less is more”. The multicoloured pom poms didn’t really fit the look. As it is , I think the mobile is too busy. If I was to start over (and I really don’t have the commitment to this project to do that) I would have:

1. Drawn out a picture of the idea first to see if I really thought it could work, and to have a plan to stick to.

2. Drawing a picture may also have meant I would only have made the pom poms I needed….though on the plus side I can use the spare pom poms now  for gift wrapping etc!

3. Not covered the 2 gold rings in the grey yarn but left them as they were. I think the mobile needs a little oomph!

4. Bought a pom pom maker! I have since been given one and it is much faster than the old school cardboard ring method!

5. Used fishing wire instead of yarn to hang everything from…again I think there is too much going on here and a translucent wire/string may have given the illusion of the pom poms hanging in space.

On the plus side…I finally had a chance to use my hot glue gun for the first time!! Love it 🙂

As I write this post, Peanut is sleeping so I can’t actually hang the mobile in the nursery yet …but I promise you it will go there… a post for another time.

A sense of achievement

This post has been a long time coming as I needed to wait until my sister in law had received the package before I could write about this project. As she lives in the UK it meant I had a bit of a wait on my hands…but I’m so pleased to say she has received it, and by all accounts she loves it. “But what is it?” I hear you asking.

Well, I can’t take credit for the concept or pattern for this project …all credit for this goes to the very talented Claire from Craft Schmaft . A few months ago, whilst I was contemplating life and this blog I came across Claire’s blog and was immediately inspired. At about the same time as a new pattern had been launched at Craft Schmaft for a hot air balloon mobile we got news that hubby’s sister was 7 weeks pregnant. I immediately purchased the pdf pattern, printed it off and started planning.

Being on the other side of the world to family can sometimes be quite tough, especially when significant life moments occur, but this is life these days so you just have to make the best of them. This baby is the first on both hubby’s and my sides of the family, so it’s a big deal. I also want this to be the beginning of a tradition I can start for my siblings and siblings-in-law to let them know that even though I’m far away they are still very important to me.

So after printing off the pattern it was time for the really fun stuff…fabric selection. Now, K & W (the proud parents to be) are no wallflowers, and a lime green kitchen with high gloss black kitchen cabinets I think is testament to that. I figured then, that brights were the way to go…whilst still keeping the mobile gender neutral.

And so here is the finished mobile….

Up, up and away!

Don’t you just love the little clouds floating in there amongst the balloons!

I will say, that while the pattern states machine sewing the balloons, I actually did everything by hand ….I think I was still very excited about starting my first quilt that I just kept going with it. I don’t feel it’s affected the quality of the end product at all….and it certainly makes me feel even prouder of it.

Now I did make one little “mistake” in there! It was a cutting error with the fabric for the hearts balloon.

Sending love over the airways!

The love hearts are upside down…but my reasoning is that this stops all the love from falling out the bottom of the heart!

My other favourite balloon is the spotty balloon….the bunting was so much fun to make, even if a tiny bit fiddly to attach…all worth it though.

Spotty balloon.

The other challenging, but fun, part of the mobile to make were the felt baskets and creating the weave effect. The photos above don’t show it very well unfortunately, but I was really pleased with the end result. Such tiny pieces of felt to work with, but they looked great in the end.

At the same time I sent this mobile over I also included a couple of other handmade gifts for baby Fleming, but I’ll save those for another post. Now we just wait for news of baby Fleming’s arrival (due in November) and then we will also know if it’s a boy or a girl…then it’s game on for some more fun projects!